Showing posts with label home. Show all posts

Saturday, August 26

CHAMBERS COLLECTIVE

Hello Everybody!

I'm sorry I kind of quit blogging. . although, I see that a lot of people still enjoy seeing some of my DIY projects - which makes me SO happy! 

Exciting things are happening!!
My husband and I started a new business called Chambers Collective. Currently, it consists of mountain prints drawn by me - digital downloads that you can buy and then download straight to your computer and print out. So convenient!


In the future we plan on adding furniture items (my husband has mad carpentry skills) and other home good items/accessories.


Please check us out and follow along with fun DIY projects on Instagram.

Shop:  https://www.etsy.com/shop/ChambersCollective

Instagram: @ChambersCollective


Thank you for your love and support!


Saturday, March 22

DIY: WOVEN STOOL

A while back I found this stool frame at a thrift store. I wanted to do something with it to replace the existing fibre rush weave that was in horrible shape. Originally, I was going to cover the stool with a piece of leather and call it good, but I never seemed to be inspired enough to get around to it. One day, while perusing the isles of target, I came across a beautifully woven bench that inspired me to do something similar with the frame that I had. So, I did it and here is how! 


Materials Needed:


Black Jute Twine
Leather Ribbon
Butcher's Twine
(one spool of each)


Stool Frame (To make it easier for you, I found footstool frame here and a saddle seat frame just like mine here.


1. Take the butcher's twine and wrap it around the front an the back of the seat frame (as shown above) and tie it as tight as you can get it. 


2. Continue to wrap the butchers twine around the frame making sure to keep the twine from overlapping itself.
It is also very important that you keep the string as tight as possible as you wrap it. My hands were a little cramped afterwards from pinching the string so tight during this process. 
Wrap until you count 115 rows


3. This is what your stool should look like now. Double check to make sure that you have 115 rows of string on the top section before tying the loose end. I tied mine to the left over string from the beginning knot that way it would be hidden inside the seat. 


4. Divide the rows into rows of five. Cut pieces of string to mark the rows (you can also use cardboard or yarn). 
Find the five rows that make up the center. This will be your starting point. 


5. Measure out pieces of the leather ribbon and the black jute. They should be long enough to tie if you were to attach them loosely. Give yourself room to work with. 


6. Here's where it might get tricky.
Remember, your starting point is the five rows in the center. 


ROW 1


  • Take a strand of leather, bring the two ends out from under the center five rows. 
  • Weave in and out ever tenth row. (As you can see, there are two rows of five left for the first row of leather to weave under. 
  • Weave in a row of Jute followed by another piece of leather. Leave all ends loose for now. 
ROW 2
  • Take another piece of leather (center point in mind) and add three stitches. In total, you will have eleven stitches as the center for the second row. This will begin to create the geometric effect. 
  • Weave in and out of every ten rows from your starting points on each side of the eleven center rows. 
  • Continue by weaving in a piece of the black jute and another piece of leather. 
Continue by adding three to each center point. 


6. To make the diamond in the middle, on the sixth row, start on top of the original center five rows. and work your out still adding three to continue the geometric effect out.

Add three to the center five, working your way out, to form the diamond.


7. When you are finished, there should be eleven on either side of the woven (leather & jute) center row (twelfth row from either front or back side). Now it is time to start securing all of the loose ends! 


Just because I thought it would be fun, I wanted to add a little bit of interest to the under side of the stool by incorporating two stripes

8. Take the string that you are securing under ten and then over ten and back under to tie.


9. Find the center point where your loose ends will meet, pull them tight an tie a knot. Tuck the loose ends into the inside of the stool. This will leave your stool looking clean and people will think it was made by a professional. 


This is just to show you the the clean finish of the under side. 


There you have it! You can now custom-make your very own stool! 
I had so much fun making this and hope you decide to conquer this project too! 

Once you start, you'll understand if you don't already. It is a very detailed project to describe fully. If any of these instructions are unclear, please let me know and I can try to find a better way to explain, even if I have to skype or facetime with you. ;]

Thursday, September 26

LITTLE THINGS

Life is full of little things. Little things that provide the feeling of comfort, and often bring the feeling of happiness and a smile to your face. It may be material or emotional, whether a memory or the way a room is arranged.  Nonetheless, they leave you feeling satisfied and maybe even a little more joyful. 
For me these "little things" mean a lot. They determine how I function and live my everyday life. If the house is full of clutter, my brain feels cluttered, so I like to decorate with more simplicity. I have said it before, but I feel like plants add a lot to the environment of a room, so I would rather decorate with plants than things. 

Anyways, these simple, "little things" make me smile. I walked around my house and took pictures of the little details that I love. The details that bring both my (and my roommates') imagination and creativity to life. We love our home. 


Tuesday, February 12

UP'S AND DOWN'S

This week has sure had it's up's and down's. After feeling sick last week and resting as much as I could I started to feel better by friday. I got to shop a little this past weekend and I bought a few things including the sweater and the cactus I added to my plant collection. There were a few birthday celebrations that took place. One of which included bowling and I shocked my friends and myself, to be quite honest, with my score of 116 the first round and 100 the next. That is the highest I have ever scored in my life, bowling! It felt good. :]
By monday, I was back to feeling sick. It was a different sickness though that put me out of work today. I have learned to appreciate life through this down time. I often take my health for granted. My heart goes out to those who may never get to leave their bed or can only do so for an extended period of time. I am blessed beyond what I even deserve.
Today my sweet mom brought over some fresh made chicken noodle soup, a smoothie and popsicles and came with the intention of keeping me company for a while. She sat next to me on my bed while I laid under the covers and we watched project runway. Who could ask for a more wonderful mother?

Here are some snapshots from my past week. Although not exactly eventful, it was not lacking in beauty.


I picked up my first book of the month for the year. I, sadly, didn't get around to reading a full book last month because every time I picked up a book I just wasn't interested. Poor way to start off the year, right? This month, although halfway over, I am determined! I'm reading Mere Christianity, which I have read before; it has been so long since, I don't remember anything about it.  

Have a wonderful night, my friends. 

Monday, January 28

SATURDAY ADVENTURES: FOG, FRIENDSHIP & A BIT ON MY MIND

Saturday started off with a mini adventure in the freezing cold, by the river. My room mate and I wanted to challenge ourselves to Instagram's Weekend Hashtag Project. The hash tag for the weekend was #WHPfoggy, so we set out early to search for fog. We did capture a few not so foggy photos, but the water was beautiful that morning. It was just nice to get outside for a bit. I have been feeling such a lack of inspiration that I think is due to not spending enough time outdoors. 


After our little expedition by the river, I joined three friends for breakfast. Dear friends that I have been entirely blessed to have. These gals are the kind of friends I have been praying for for years and each one of their friendships have been a testimony of God's grace on my life. I have learned from each of them as we have grown in our relationships with each other and with our Heavenly Father. I am excited for many years and breakfasts to come in our future. 


January is a few days from being over and I have had a lot on my mind. I will be moving to a new apartment in about three months and I have been busy figuring out what objects I want to carry into my future. I have purged my closet, bookshelf and drawers to get rid of the things I have held onto for too long. I started my week feeling a lot more energized because my room is actually not in a state of disarray. I've even made my bed these past few days. My goal for this week is to finish the projects that have been hanging over my head for the past month that I just have not managed to get to. A few among many little projects consist of sewing a button back onto one of my shirts, making a makeup bag and making curtains. These little projects are so easy, I don't know why I have such a hard time getting around to doing them. I know that getting the little projects out of the way will also help me to feel better about starting new, bigger projects - like the blanket I started knitting last night. With that said, bring it on, little projects!


Saturday, November 10

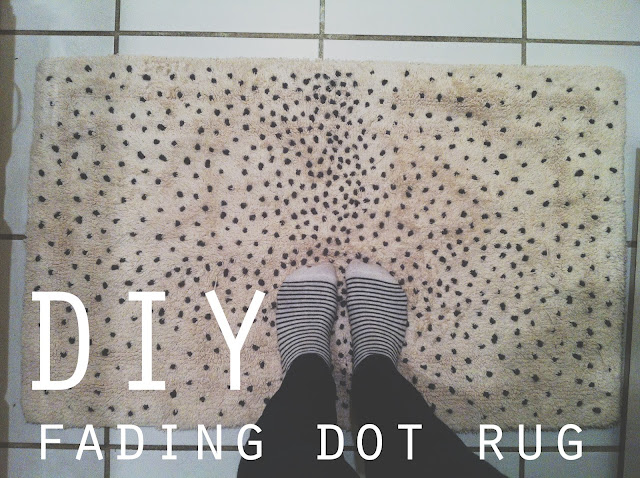
DO IT YOURSELF: FADING DOT RUG


I was given this rug for free a while back and have always wanted to do something with it. Inspiration struck once I saw my Kinsey give DIY instructions for an Anthropologie inspired rug. I totally had not thought of using yarn for it. Not knowing exactly what to do I put the project in the back of my mind. I wanted to make a rug that I could put my own little spin on. Then one day I was looking at a sweater at Urban Outfitters online (couldn't find the link to show you) and was further inspired by what I will call a "fading dots" pattern. The dots were placed heavier in the middle and more spread out toward the edges. I decided to use the inspiration from the sweater and recreate the effect on my plane jane rug. 


YOU WILL NEED:
A rug
Yarn
Yarn Needle
Scissors


Go ahead and start by cutting off a long piece of yarn (about one yard). Thread the needle and tie a knot at the opposite end. Pull the yarn through the rug for the first knot. 
**this knot is an embroidery knot many of you many know how to do already. In that case, you can skip the next steps and run wild with your ideas of what you would like your dot rug pattern to look like. :]


 To make the knot: Once you have pulled the yarn through from the back to the top of the rug, wrap your yarn around the needle. This should start with the yarn that is closest to the rug (as depicted above) The more you wrap it, the bigger the knot. Mine all averaged about 5-7 wraps. 


Take the needle -still wrapped in yarn- and push the needle back through the rug close to where you pulled it out. and there you have your knot. 

I used this technique throughout the whole rug, placing the knots closer together in the middle and making them further part as they progressed to the side edges.

Although this project is a little more tedious than it would be to paint dots on a rug with fabric paint, it can be rewarding when finished. Not only do you have a cute, revamped rug; It is also full of texture from the knots. Depending on how many dots and what pattern you choose to do will determine the amount of time required to finish this project. It is an excellent project to watch TV or movies while working away. 

Tomorrow I am going to enjoy the day off on my friends farm, in her adorable house in the middle of country. Have a great saturday! 

Wednesday, October 31

TACTFULLY REPURPOSED

There are so many little ways to recycle or repurpose objects. I try to recycle as much as it is possible. One reason being, I always feel bad throwing things away that, I know, could be used for something else in some way or another. These are just a few of the things that I have reused in practical ways, that are easy and can be accomplished by anyone. 

 This shower curtain, I made, from an old sheet that was missing it's matching fitted sheet.
I think it might eventually be fun to make a few different shower curtains to change out with the seasons.
This is a cheap and super easy way to have a custom shower curtain.
You can dip dye, embroider or paint it to perfectly match your style.  
 
I took this glass out of an old wooden candle shadow box. As cool as it was, the style of the box was just not my thing. I loved the glass so I took it out and now  use it to set my straightener on to protect the wood on my dresser. 
Quite a while back, I saw these owl rocks on floating around on Pinterest. So I made one to serve as a paperweight from a rock I picked up off of the ground in Colorado.
[Sadly, I do not know the source for this splendid idea.
 If you know it please let me know so that I can give credit where credit is due! Thank you! ]

This way to hang necklaces isn't necessarily a way to recycle anything, but rather a way to repurpose and transform a dead, awkward wall space. I am thankful for this awkward wall between my closet doors. It makes the perfect place to display necklaces.  
This old, scrap piece of sheet metal became a very useful magnetic chalkboard that now serves as my inspiration board. I write a new quote on it every few months. 

Plates can come in handy to use as ring, earring and bracelet holders. The glass that my cactus is growing in was a container that a candle came in. It's crazy to think just how many of these get thrown away each year.


I'm curious to know, what are some things that you have recycled/repurposed?